Wednesday, July 27, 2005
Dyeing the Back and Sides
The body of the guitar is basswood. I considered just painting it black but in the end (because I didn't have any black paint) decided to use the same layering technique I had on the front. I wouldn't use a pre-dye though.
After one aborted attempt at masking off the top I started over using a paper cut out to cover the top first. Masking is more important this time since it has to protect the color on the top. I masked the top and the natural binding. This was a lot more work than making the sides.

After setting up my paint booth again (a week has past and I wasn't going to keep parking in the driveway) I was ready to dye again. This time I set up a variant of the Stack-O-Wood called the Pile-O-Wood specifically engineered for painting the sides of the body.

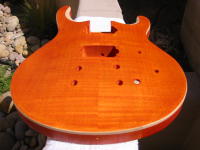
Here is the body in the early stages of dyeing and after it's done. I waited a minimum of five minutes between coats. Even though I used a lot of yellow the basswood dyed darker than the maple. It was hard to compare the colors since the top was masked off.


Peeling off the masking revealed a beautifully contrasting natural binding. And in a time-consuming but entertaining effort I got the entire masking off in one piece.


I applied my engineering background to construct a drying mechanism from available furniture and a wire coat hanger.

Here is the final color on the body. This is turning out so well I'm already starting to think of my next project...


Here are some time consuming lessons I'll keep in mind.
After one aborted attempt at masking off the top I started over using a paper cut out to cover the top first. Masking is more important this time since it has to protect the color on the top. I masked the top and the natural binding. This was a lot more work than making the sides.

After setting up my paint booth again (a week has past and I wasn't going to keep parking in the driveway) I was ready to dye again. This time I set up a variant of the Stack-O-Wood called the Pile-O-Wood specifically engineered for painting the sides of the body.

Here is the body in the early stages of dyeing and after it's done. I waited a minimum of five minutes between coats. Even though I used a lot of yellow the basswood dyed darker than the maple. It was hard to compare the colors since the top was masked off.


Peeling off the masking revealed a beautifully contrasting natural binding. And in a time-consuming but entertaining effort I got the entire masking off in one piece.


I applied my engineering background to construct a drying mechanism from available furniture and a wire coat hanger.

Here is the final color on the body. This is turning out so well I'm already starting to think of my next project...


Here are some time consuming lessons I'll keep in mind.
- Don't build a wall of masking tape around the sides of the body then try to fill it in. Just make a paper cut out of the top and tape it down.
- Do not spray in upward strokes. This causes droplets to splatter on the newly dyed surface. Lightly rubbing with a rag slightly damp with lacquer thinner blended in the drops. Act fast though, it evaporates quickly.
- I should have marked the bottom of the binding before masking the natural binding. I over masked the binding making it slightly larger and allowing some dye to bleed onto bare wood. Lots of extra scraping and the line isn't as sharp.
- Wait until the dye is really dry before wiping off the tape residue with Naphtha. Otherwise it will cause the dye to bleed and smudge an otherwise sharp natural binding. More scraping.