Wednesday, July 27, 2005
Dyeing the Maple Top
PRS uses alcohol soluble wood dyes, so I did too. The forums suggested that lacquer thinner could be used in place of alcohol so I did that to avoid yet another purchase. I picked up a couple of disposable Preval spray units from Home Depot. I cleaned out a couple of glass jars (salsa and Snapple) to hold the mixed dyes and fashioned a funnel from a soda bottle.


I masked off the sides of the body completely including the natural binding leaving nothing but the top exposed. I built a new, standing paint boot from some cinder blocks and plywood. Those lessons are already paying off. I have a patent pending on the device used to support the body of the guitar which I like to call the Stack-O-Wood.


In order to enhance the grain of the maple top to give it a deeper look I decided to pre-dye using dark orange. The idea is to get a dark color into the grain of the wood (hence the need to strip off the sealer) then sand back to the bare wood leaving the color in the grain. From there I figure I'll finish it off with yellow for a sort of zebra-stripe look. After many coats of dye I had a decidedly orange guitar.


I let it dry overnight and began to sand back the color. I started to go for a sunburst type finish sanding more in the middle and less toward the edges. This didn't look like a sunburst fade so much as a half-sanded guitar body. From there I decided just to sand the whole thing.


It would seem that the grain didn't get all that much color. I feared that would happen since there is probably still plenty of sealer in the grain. Oh well, so much for my zebra-stripe finish. Another lesson learned.
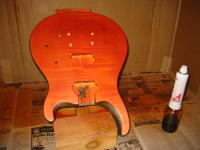
Back to the paint booth, this time armed with both yellow and orange. Since not much orange remained after the pre-dye I figured I'd just layer yellow and orange and see what happens. It was difficult to see the color in my garage so I kept taking it outside until I liked the results.

After it dried I removed the masking tape to find some minor bleeding onto the natural binding. Good thing it's protected by the clear coat! I used an X-Acto knife to scrape away the extra color.


According to the Guitar ReRanch the dye would appear blotchy and dull until the clear coats are added. So far the finish is pretty vibrant. I can't wait to see it with clear coats!
The lessons learned this time aren't just from mistakes.


I masked off the sides of the body completely including the natural binding leaving nothing but the top exposed. I built a new, standing paint boot from some cinder blocks and plywood. Those lessons are already paying off. I have a patent pending on the device used to support the body of the guitar which I like to call the Stack-O-Wood.


In order to enhance the grain of the maple top to give it a deeper look I decided to pre-dye using dark orange. The idea is to get a dark color into the grain of the wood (hence the need to strip off the sealer) then sand back to the bare wood leaving the color in the grain. From there I figure I'll finish it off with yellow for a sort of zebra-stripe look. After many coats of dye I had a decidedly orange guitar.


I let it dry overnight and began to sand back the color. I started to go for a sunburst type finish sanding more in the middle and less toward the edges. This didn't look like a sunburst fade so much as a half-sanded guitar body. From there I decided just to sand the whole thing.


It would seem that the grain didn't get all that much color. I feared that would happen since there is probably still plenty of sealer in the grain. Oh well, so much for my zebra-stripe finish. Another lesson learned.
Back to the paint booth, this time armed with both yellow and orange. Since not much orange remained after the pre-dye I figured I'd just layer yellow and orange and see what happens. It was difficult to see the color in my garage so I kept taking it outside until I liked the results.

After it dried I removed the masking tape to find some minor bleeding onto the natural binding. Good thing it's protected by the clear coat! I used an X-Acto knife to scrape away the extra color.


According to the Guitar ReRanch the dye would appear blotchy and dull until the clear coats are added. So far the finish is pretty vibrant. I can't wait to see it with clear coats!
The lessons learned this time aren't just from mistakes.
- Sanding off Saga sealer doesn't get it out of the grain.
- Layering dyes seems to make a nice iridescent finish.
- Including the beveled cut outs in the natural binding was a good idea!