Saturday, November 11, 2006
Clear Coating the Body
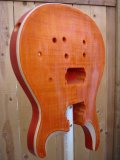
This step is easy: Spray on a whole bunch of clear lacquer and BAM! you've got a beautiful guitar. Ok, perhaps it's not that simple. To prove this fact I launched a few large droplets of clear coat onto the face of the body to mar an otherwise beautiful finish. This happened after I'd already applied a couple of coats of clear so it's not as bad as it could have been. I let it dry overnight because I knew there was only one way to fix it and I wasn't looking forward to it.

The only way to fix this involved my arch-nemesis: sanding. I used a finer grade of sandpaper than I'd used in the sanding sealer fiasco. I wrapped it around a 9-volt battery and *gently* sanded the area around the droplets. For good measure (and to tempt the Fates) I decided to scuff sand the entire body.


The sanding went much better than it had before but I did manage once again to sand off a bit of color. This time it shows as a yellow spot on the face of the guitar. I used my full-strength dye mixture to patch the spot. You may have trouble seeing the flaw in the small picture but it jumps out to my eye. By the way, I really should be wearing gloves here...

The patch was fairly successful. I may be the only one who still thinks it's flawed. The first few coats I added were very thin. I've started slowing down my spray passes to build the thickness. After a few coats of clear the finish is really looking good!

Things to remember:

The only way to fix this involved my arch-nemesis: sanding. I used a finer grade of sandpaper than I'd used in the sanding sealer fiasco. I wrapped it around a 9-volt battery and *gently* sanded the area around the droplets. For good measure (and to tempt the Fates) I decided to scuff sand the entire body.


The sanding went much better than it had before but I did manage once again to sand off a bit of color. This time it shows as a yellow spot on the face of the guitar. I used my full-strength dye mixture to patch the spot. You may have trouble seeing the flaw in the small picture but it jumps out to my eye. By the way, I really should be wearing gloves here...

The patch was fairly successful. I may be the only one who still thinks it's flawed. The first few coats I added were very thin. I've started slowing down my spray passes to build the thickness. After a few coats of clear the finish is really looking good!

Things to remember:
- I can't sand over color to save my life. Avoid this at all cost on future projects.
- Using a finer grade of sand paper was a good idea.
- Add clear coat in slow, smooth motions. Not enough lacquer builds up with fast passes.